Real-time Analytics with Snowflake Dynamic Tables & Redpanda
Introduction
Snowflake redefined the way we approach data engineering with its innovative concept of dynamic tables. These dynamic tables can serve as the cornerstone of declarative data transformation pipelines, revolutionizing the way data is prepared, processed, and delivered in the Snowflake ecosystem.
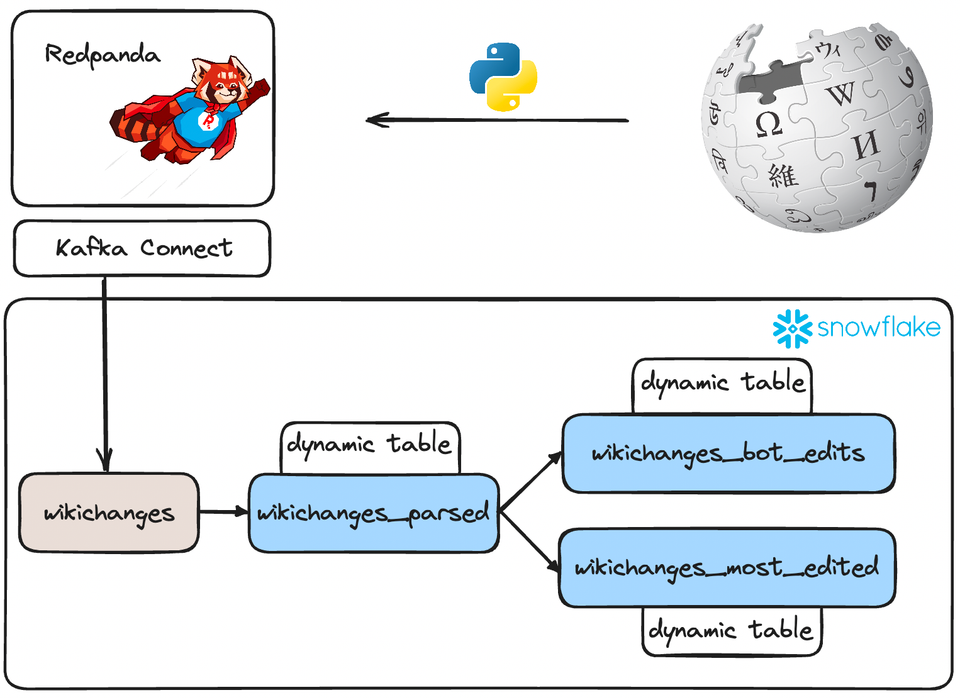
In this article, we'll check out the power and potential of dynamic tables in Snowflake, and how they can be harnessed to analyze real-time data from the Wikimedia Changes Streaming API.
Dynamic tables
Dynamic tables offer a streamlined and efficient approach to data engineering, allowing organizations to simplify complex data transformation tasks while maintaining reliability, cost-effectiveness, and automation.
Traditional data pipelines often involve defining a series of intricate tasks, managing dependencies, and scheduling workflows. With dynamic tables, Snowflake takes the reins, enabling you to focus on defining the desired end state of your data transformation.
At its core, a dynamic table represents the outcome of a query that you specify. Rather than creating separate target tables and crafting code to transform and update data within those tables, you can declare your target table as a dynamic table. Here, you prescribe the SQL statement responsible for the transformation, and Snowflake handles the rest through automated processes, regularly refreshing the materialized results.
One critical distinction is that the content of a dynamic table is entirely determined by the underlying query. This immutability means that traditional Data Manipulation Language (DML) operations, such as inserts, updates, or deletes, are not applicable to dynamic tables. Instead, the magic unfolds through automated refresh processes, crystallizing the query results into dynamic tables.
Setting the stage
First of all, we need to access the data! As mentioned earlier, we'll be using the free & public Wikimedia change stream API as our source for change events. This API provides streaming data in the form of Server-Side Events, which we can easily consume with Python. Let's see how!
def produce_events_from_url(url: str, topic: str) -> None:
    producer = KafkaProducer(
        bootstrap_servers=BOOTSTRAP_SERVERS, client_id="wikidata-producer"
    )
    response = requests.get(url, headers={"Accept": "text/event-stream"}, stream=True)
    client = sseclient.SSEClient(response)
    for event in client.events():
        if event.event == "message":
            try:
                parsed_event_metadata = json.loads(event.id)
                parsed_event_value = json.loads(event.data)
            except ValueError:
                pass
            else:
                key = json.dumps(parsed_event_metadata)
                value = json.dumps(parsed_event_value)
                producer.send(
                    topic, value=value.encode("utf-8"), key=key.encode("utf-8")
                )
This function will (endlessly) read incoming changes from the API and send them straight into a Redpanda topic. The structure of a record is something like this (in JSON format):
{
"$schema": "/mediawiki/recentchange/1.0.0",
"meta": {
"uri": "https://www.wikidata.org/wiki/Q8495340",
"request_id": "bef918c5-68a6-4688-b864-c96f42e387cd",
"id": "b0020437-0166-42a0-9bd0-c312d4a6a953",
"dt": "2023-09-17T09:41:32Z",
"domain": "www.wikidata.org",
"stream": "mediawiki.recentchange",
"topic": "eqiad.mediawiki.recentchange",
"partition": 0,
"offset": 4951955522
},
"id": 2036411424,
"type": "edit",
"namespace": 0,
"title": "Q8495340",
"title_url": "https://www.wikidata.org/wiki/Q8495340",
"comment": "/* clientsitelink-update:0|arwiki|arwiki:تصنيف:وكالات حكومية تأسست في 1949|arwiki:تصنيف:وكالات حكومية أسست في 1949 */",
"timestamp": 1694943692,
"user": "Mr.Ibrahembot",
"bot": false,
"notify_url": "https://www.wikidata.org/w/index.php?diff=1976119604&oldid=1976119601&rcid=2036411424",
"minor": false,
"patrolled": true,
"length": {
"old": 15775,
"new": 15773
},
"revision": {
"old": 1976119601,
"new": 1976119604
},
"server_url": "https://www.wikidata.org",
"server_name": "www.wikidata.org",
"server_script_path": "/w",
"wiki": "wikidatawiki",
"parsedcomment": "<span dir=\"auto\"><span class=\"autocomment\">Page moved from [arwiki:تصنيف:وكالات حكومية تأسست في 1949] to [arwiki:تصنيف:وكالات حكومية أسست في 1949]</span></span>"
}As you can see, there are a lot of fields we can work with!
As a key component in this architecture, we'll be utilizing Redpanda as the streaming platform which will help us ingest the data stream and publish it to Snowflake.
For convenience, I created a docker-compose.yml file that contains every service we need to run this example project, including Redpanda, Kafka Connect & a containerized version of the data generator script.
Here is the complete docker-compose file:
version: '3.7'
name: wikichanges

networks:
  redpanda_network:
    driver: bridge

volumes:
  redpanda: null

services:
  datagen:
    container_name: datagen
    build:
      context: datagen
      dockerfile: Dockerfile
    networks:
      - redpanda_network
    depends_on:
      - redpanda

  redpanda:
    container_name: redpanda
    image: docker.redpanda.com/redpandadata/redpanda:v23.2.8
    command:
      - redpanda start
      - --smp 1
      - --overprovisioned
      - --kafka-addr internal://0.0.0.0:9092,external://0.0.0.0:19092
      - --advertise-kafka-addr internal://redpanda:9092,external://localhost:19092
      - --pandaproxy-addr internal://0.0.0.0:8082,external://0.0.0.0:18082
      - --advertise-pandaproxy-addr internal://redpanda:8082,external://localhost:18082
      - --schema-registry-addr internal://0.0.0.0:8081,external://0.0.0.0:18081
      - --rpc-addr redpanda:33145
      - --advertise-rpc-addr redpanda:33145
    ports:
      - "18081:18081"
      - "18082:18082"
      - "19092:19092"
      - "19644:9644"
    volumes:
      - redpanda:/var/lib/redpanda/data
    networks:
      - redpanda_network

  console:
    container_name: console
    image: docker.redpanda.com/redpandadata/console:v2.3.1
    entrypoint: /bin/sh
    command: -c "echo \"$$CONSOLE_CONFIG_FILE\" > /tmp/config.yml; /app/console"
    environment:
      CONFIG_FILEPATH: /tmp/config.yml
      CONSOLE_CONFIG_FILE: |
        kafka:
          brokers: ["redpanda:9092"]
          schemaRegistry:
            enabled: true
            urls: ["http://redpanda:8081"]
        redpanda:
          adminApi:
            enabled: true
            urls: ["http://redpanda:9644"]
        connect:
          enabled: true
          clusters:
            - name: local-connect-cluster
              url: http://connect:8083
    ports:
      - "8080:8080"
    networks:
      - redpanda_network
    depends_on:
      - redpanda

  connect:
    image: docker.redpanda.com/redpandadata/connectors:latest
    hostname: connect
    container_name: connect
    networks:
      - redpanda_network
    depends_on:
      - redpanda
    ports:
      - "8083:8083"
    volumes:
      - ./connect-plugins:/opt/kafka/connect-plugins
    environment:
      CONNECT_CONFIGURATION: |
        key.converter=org.apache.kafka.connect.converters.ByteArrayConverter
        value.converter=org.apache.kafka.connect.converters.ByteArrayConverter
        group.id=connectors-cluster
        offset.storage.topic=_internal_connectors_offsets
        config.storage.topic=_internal_connectors_configs
        status.storage.topic=_internal_connectors_status
        config.storage.replication.factor=-1
        offset.storage.replication.factor=-1
        status.storage.replication.factor=-1
        offset.flush.interval.ms=1000
        producer.linger.ms=50
        producer.batch.size=131072
      CONNECT_BOOTSTRAP_SERVERS: redpanda:9092
      CONNECT_GC_LOG_ENABLED: "false"
      CONNECT_HEAP_OPTS: -Xms512M -Xmx512M
      CONNECT_LOG_LEVEL: info
CONNECT_PLUGIN_PATH: "/opt/kafka/connect-plugins"Before spinning up all the containers with docker-compose up, make sure to download the Snowflake Kafka Connector jar and place it in a directory called connector-plugins in the repository root.
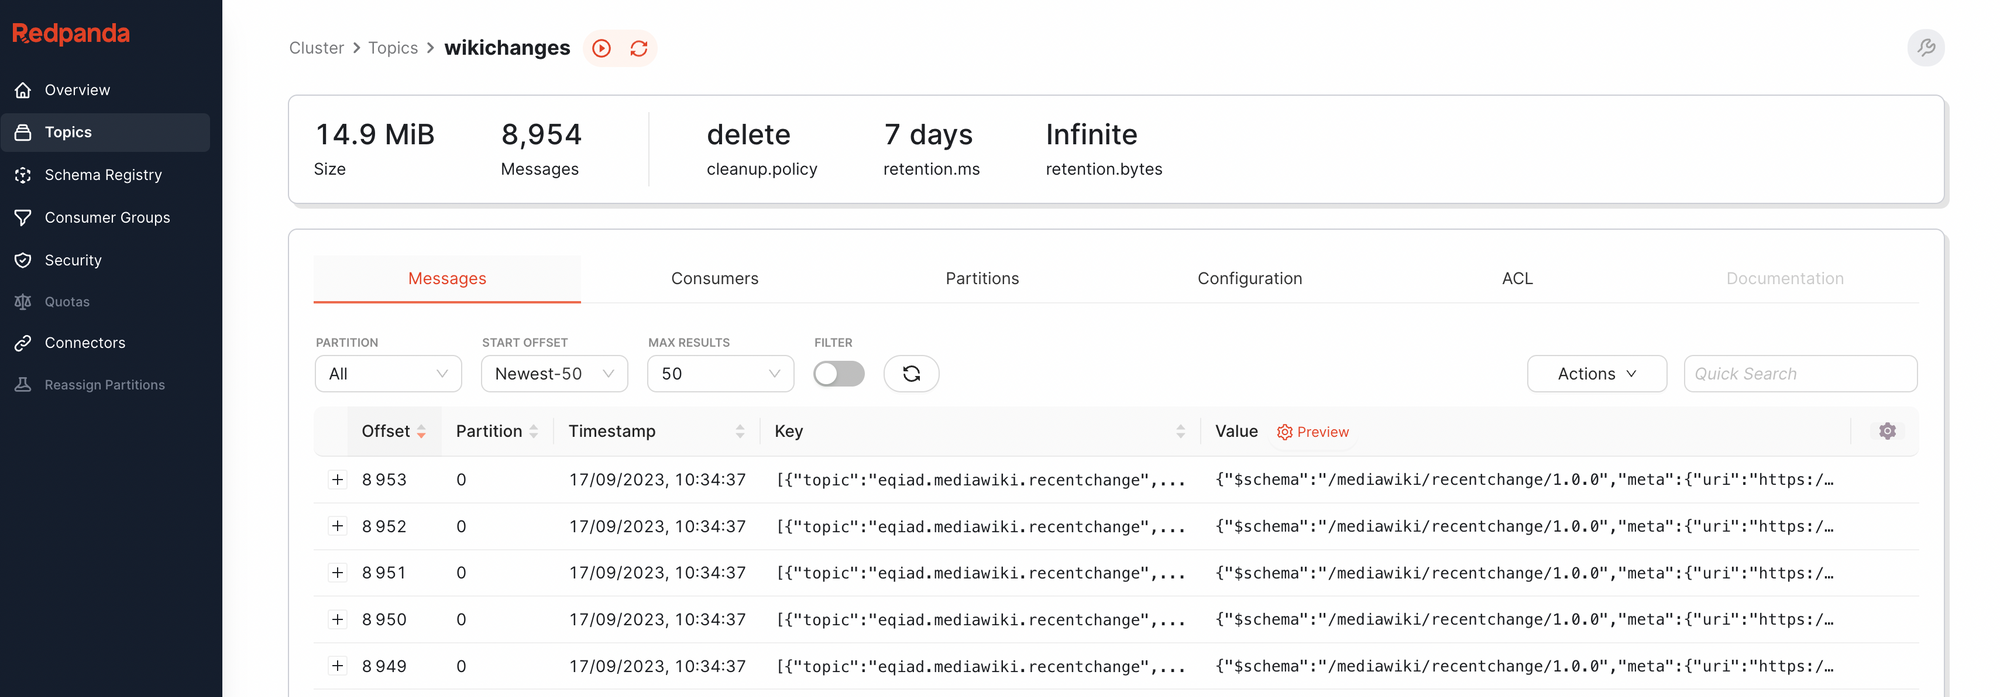
After running the data generator script for a bit, we can head over to the Redpanda console and verify that the records are, in fact, landing in a topic called wikichanges
Great! The next step is streaming this data into Snowflake. Let's see how easy that is.
Snowpipe Streaming API
If you read my article on ingestion methods for Snowflake, you might remember the Snowpipe Streaming API – if not, here's a refresher:
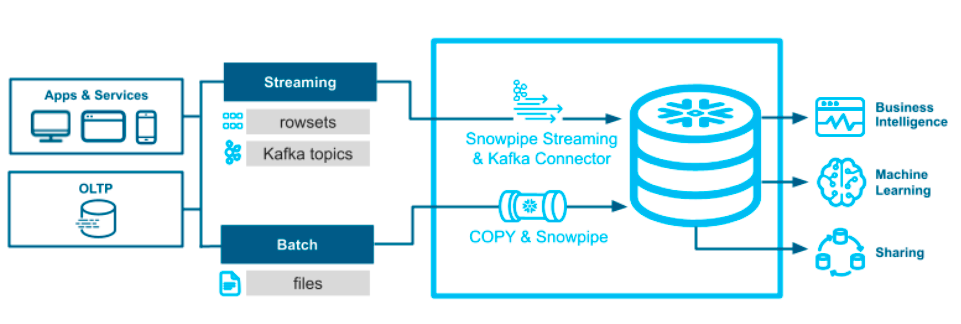
Traditional data loading methods, such as bulk loading or Snowpipe, primarily rely on staging files. In contrast, the Snowflake Streaming API takes a different approach by enabling low-latency, real-time data loading at the row level. This unique architecture translates into reduced data loading latencies, resulting in lower costs for handling similar data volumes. In essence, it's a game-changer for managing real-time data streams.
When it comes to streaming data ingestion for Snowflake, the combination of Snowflake Streaming API and Kafka stands out as the superior choice. Here's why:
- Low Latency: Snowflake Streaming API excels at row-level loading, ensuring minimal data ingestion delays.
- Cost Efficiency: By writing rows of data directly to Snowflake tables, it eliminates the need for temporary staged files, resulting in lower costs for similar data volumes.
- Seamless Integration: The Kafka connector seamlessly integrates with Snowpipe Streaming, streamlining data flows and making real-time data handling a breeze.
- Exactly-Once Semantics: This combo ensures exactly-once delivery of Kafka messages, eliminating duplication and data loss risks.
- Schema Evolution: It supports schema detection and evolution, automatically adapting to new data structures.
To take advantage of these features, all we have to do is create a Snowflake sink Kafka Connector with the following configuration:
{
    "name": "wikichanges-snowflake-sink",
    "config": {
        "connector.class": "com.snowflake.kafka.connector.SnowflakeSinkConnector",
        "snowflake.database.name": "<SNOWFLAKE_DATABASE>",
        "snowflake.ingestion.method": "snowpipe_streaming",
        "snowflake.private.key": "<SNOWFLAKE_PRIVATE_KEY>",
        "snowflake.role.name": "<SNOWFLAKE_ROLE>",
        "snowflake.schema.name": "<SNOWFLAKE_SCHEMA>",
        "snowflake.url.name": "<SNOWFLAKE_URL>",
        "snowflake.user.name": "<SNOWFLAKE_USER>",
        "topics": "wikichanges",
        "value.converter": "org.apache.kafka.connect.storage.StringConverter"
    }
}
The most important value here is "snowflake.ingestion.method": "snowpipe_streaming" – this allows the connector to use the Snowpipe Streaming API instead of the old-school stage-based microbatching strategy.
To generate a public/private key pair, which is required for this connector to authenticate to Snowflake, all you have to do is run these commands:
$ openssl genrsa 2048 | openssl pkcs8 -topk8 -inform PEM -out rsa_key.p8 -nocrypt
$ openssl rsa -in rsa_key.p8 -pubout -out rsa_key.pub
I've provided a helper script in the repository called create-connector.sh, which makes it a breeze to create our Snowflake sink. After running it, we can verify that it has been created by visiting the Redpanda console again.
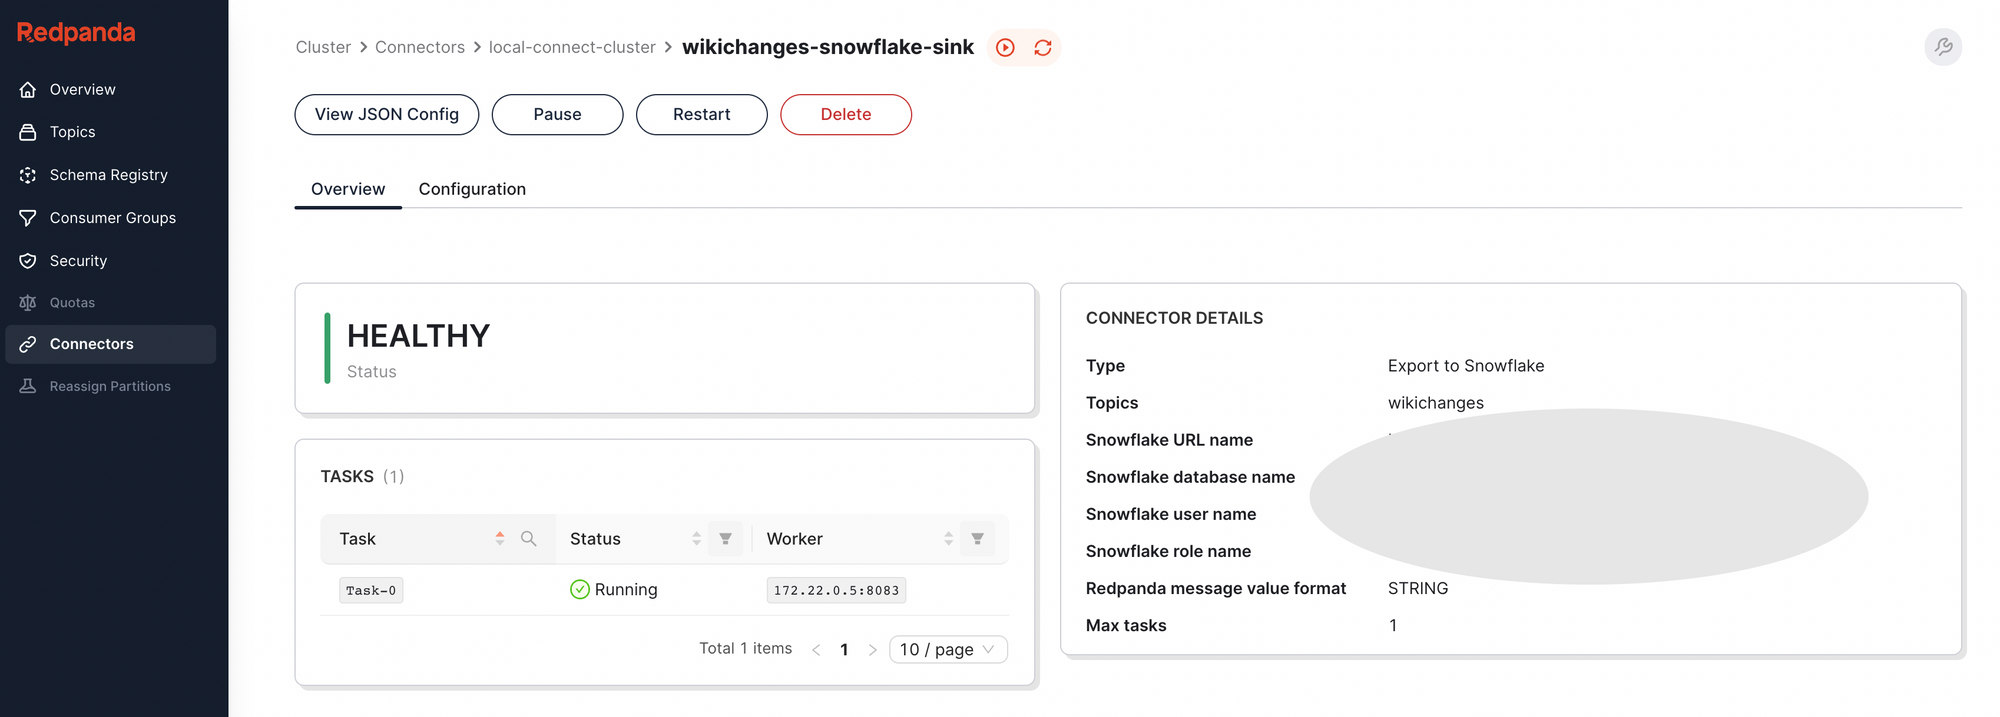
Let's head over to Snowflake and check if the target table is being populated.
select * from wikichanges;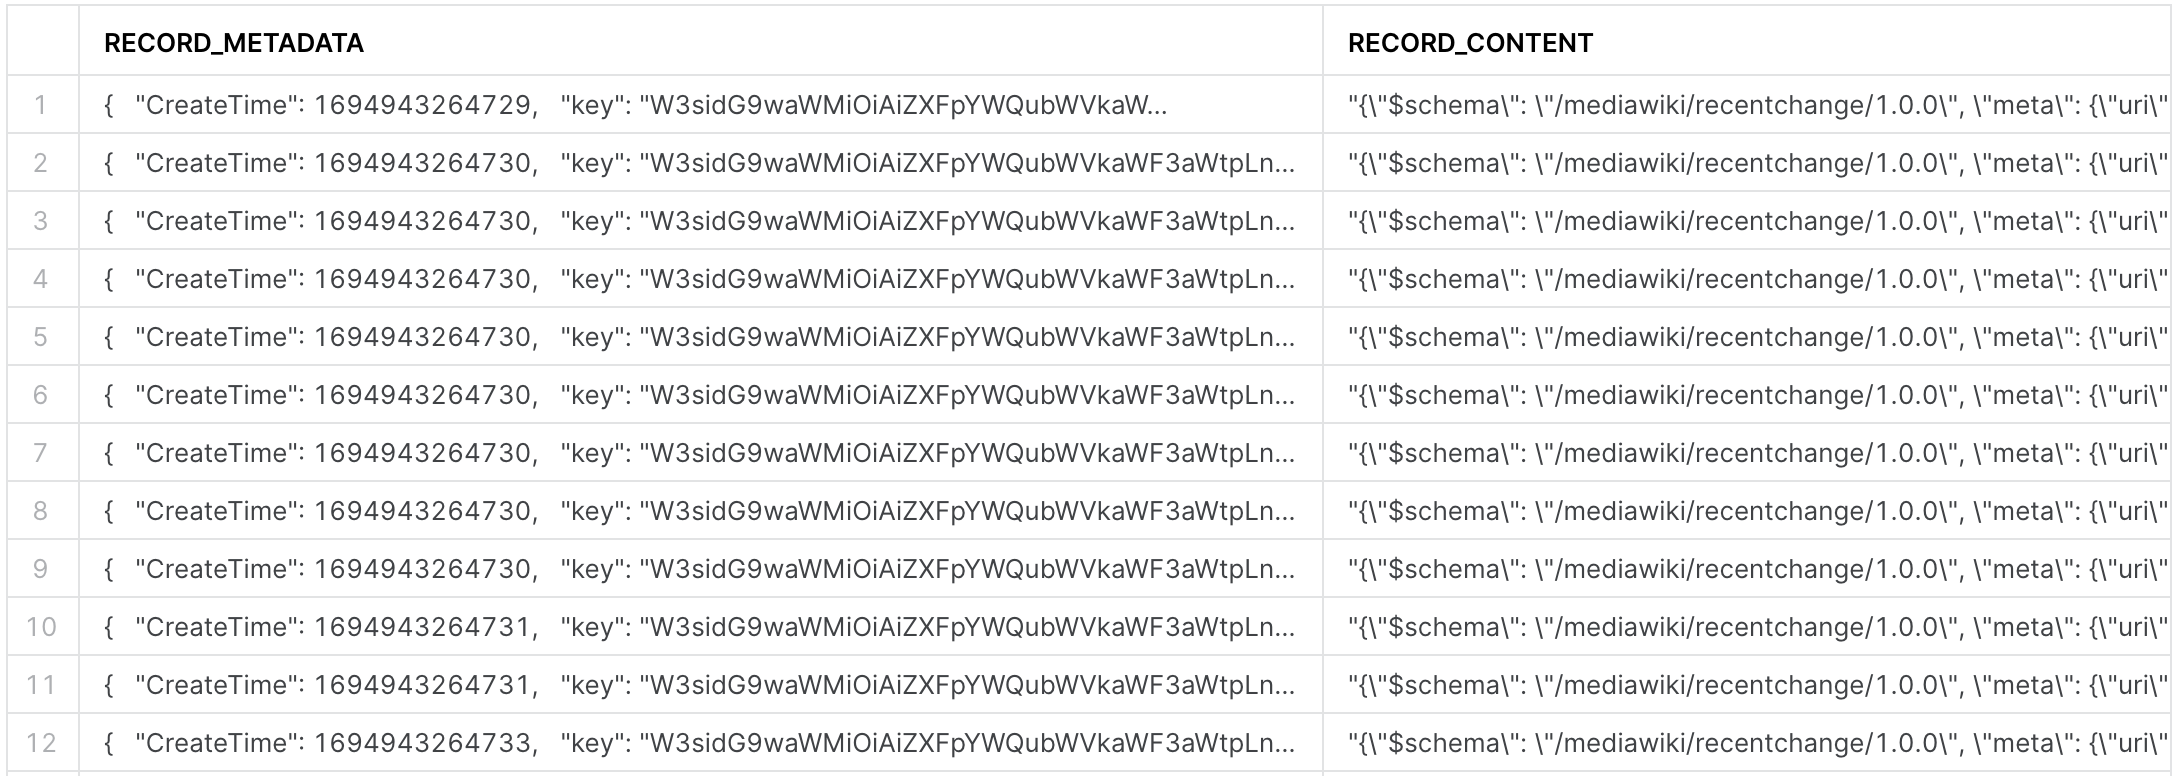
Neat, the data is there, although it looks very ugly. Time for some data engineering with dynamic tables!
Dynamic tables
Dynamic tables are great. They offer a flexible and efficient way to transform data within Snowflake, simplifying the data engineering process.
Instead of following traditional data transformation steps that require multiple tasks, dependencies, and scheduling, dynamic tables allow you to define the desired end state of your data transformation. You specify a SQL statement to perform the transformation, and Snowflake takes care of the rest.
Here's what makes dynamic tables a game-changer:
- Automated Transformation: Dynamic tables automatically materialize the results of your specified query through regular refreshes. You don't need to create separate target tables or write code for data updates—Snowflake handles it for you.
- Immutable Content: The content of a dynamic table is entirely determined by the query you provide. This immutability ensures data consistency and prevents modifications via DML operations, making it ideal for reliable data transformation.
- Simplified Management: Dynamic tables eliminate the complexities of managing intricate data pipelines. You focus on defining the transformation logic, and Snowflake ensures the transformation's execution. (Sounds familiar? dbt is built on the same philosophy!)
With that said, let's create our first dynamic table.
create or replace dynamic table wikichanges_parsed
target_lag = '1 minute'
warehouse = 'dani_test'
as (
    with content_json as (
        select parse_json(RECORD_CONTENT) as json_record from wikichanges
    )

    select
      json_record:bot::BOOLEAN AS bot,
      json_record:comment::STRING AS comment,
      json_record:id::INT AS id,
      json_record:meta:domain::STRING AS domain,
      json_record:meta:dt::TIMESTAMP AS dt,
      json_record:meta:id::STRING AS meta_id,
      json_record:meta:offset::INT AS offset,
      json_record:meta:partition::INT AS partition,
      json_record:meta:request_id::STRING AS request_id,
      json_record:meta:stream::STRING AS stream,
      json_record:meta:topic::STRING AS topic,
      json_record:meta:uri::STRING AS uri,
      json_record:namespace::INT AS namespace,
      json_record:notify_url::STRING AS notify_url,
      json_record:parsedcomment::STRING AS parsedcomment,
      json_record:server_name::STRING AS server_name,
      json_record:server_script_path::STRING AS server_script_path,
      json_record:server_url::STRING AS server_url,
      json_record:timestamp::TIMESTAMP AS timestamp,
      json_record:title::STRING AS title,
      json_record:title_url::STRING AS title_url,
      json_record:type::STRING AS type,
      json_record:user::STRING AS user,
      json_record:wiki::STRING AS wiki
    from content_json
);
This SQL query creates or replaces a dynamic table called "wikichanges_parsed" with specific settings and structure based on data from a source table called "wikichanges." Here's a breakdown of the query:
Dynamic Table Settings:
target_lag = '1 minute': This setting specifies a target lag of 1 minute for the dynamic table. This means that the dynamic table should aim to stay no more than 1 minute behind the source data.warehouse = 'DANI_TEST': This setting assigns the table to use the Snowflake warehouse named "DANI_TEST" for processing. Every time the table is refreshed, either manually or via the schedule inferred from thetarget_lagsetting, this is the warehouse that will be used for all computations.
Column Selection and Type Casting
parse_json(RECORD_CONTENT) as json_record from wikichanges: It selects data from the wikichanges table, specifically the "RECORD_CONTENT" column, and parses it as JSON.- The main query selects specific fields from the "json_record" JSON data and casts them into appropriate data types.
- For example,
json_record:bot::BOOLEAN AS botselects the "bot" field from the JSON data and casts it as a boolean, renaming it as "bot" in the dynamic table. - Similar operations are performed for other fields like "comment," "id," "dt," "meta_id," and so on.
After we run this SQL query, let's try querying our table.
select * from wikichanges_parsed;
Because our dynamic table has a 1 minute lag specified on creation, we'll have to either wait until the first minute passes after creation for a scheduled refresh, or, we can trigger one manually via the following query:
alter dynamic table wikichanges_parsed refresh;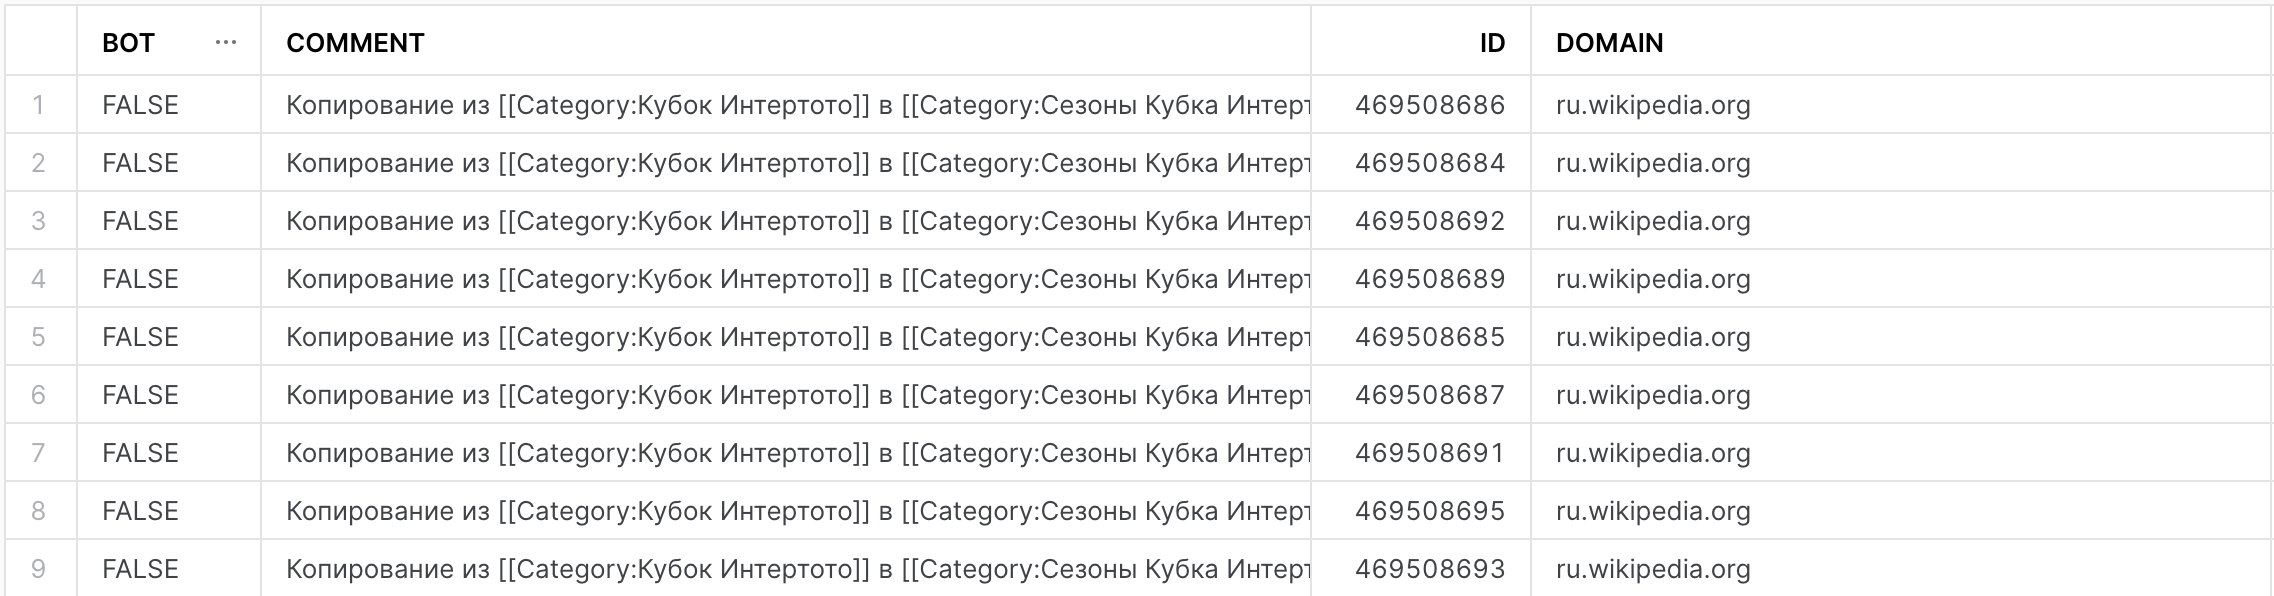
Okay, now we're getting somewhere!
Let's create two more dynamic tables that query from this dynamic table.
create or replace dynamic table wikichanges_bot_edits
target_lag = '1 minute'
warehouse = 'DANI_TEST'
as (
select
domain
, COUNT(CASE WHEN bot = TRUE THEN 1 END) AS bot_edits
, COUNT(CASE WHEN bot = FALSE THEN 1 END) AS human_edits
,
from wikichanges_parsed
group by domain
order by bot_edits desc
);
create or replace dynamic table wikichanges_most_edited
target_lag = '1 minute'
warehouse = 'DANI_TEST'
as (
select
title,
uri,
count(*) AS edit_count
from wikichanges_parsed
group by title, uri
order by edit_count DESC
limit 10
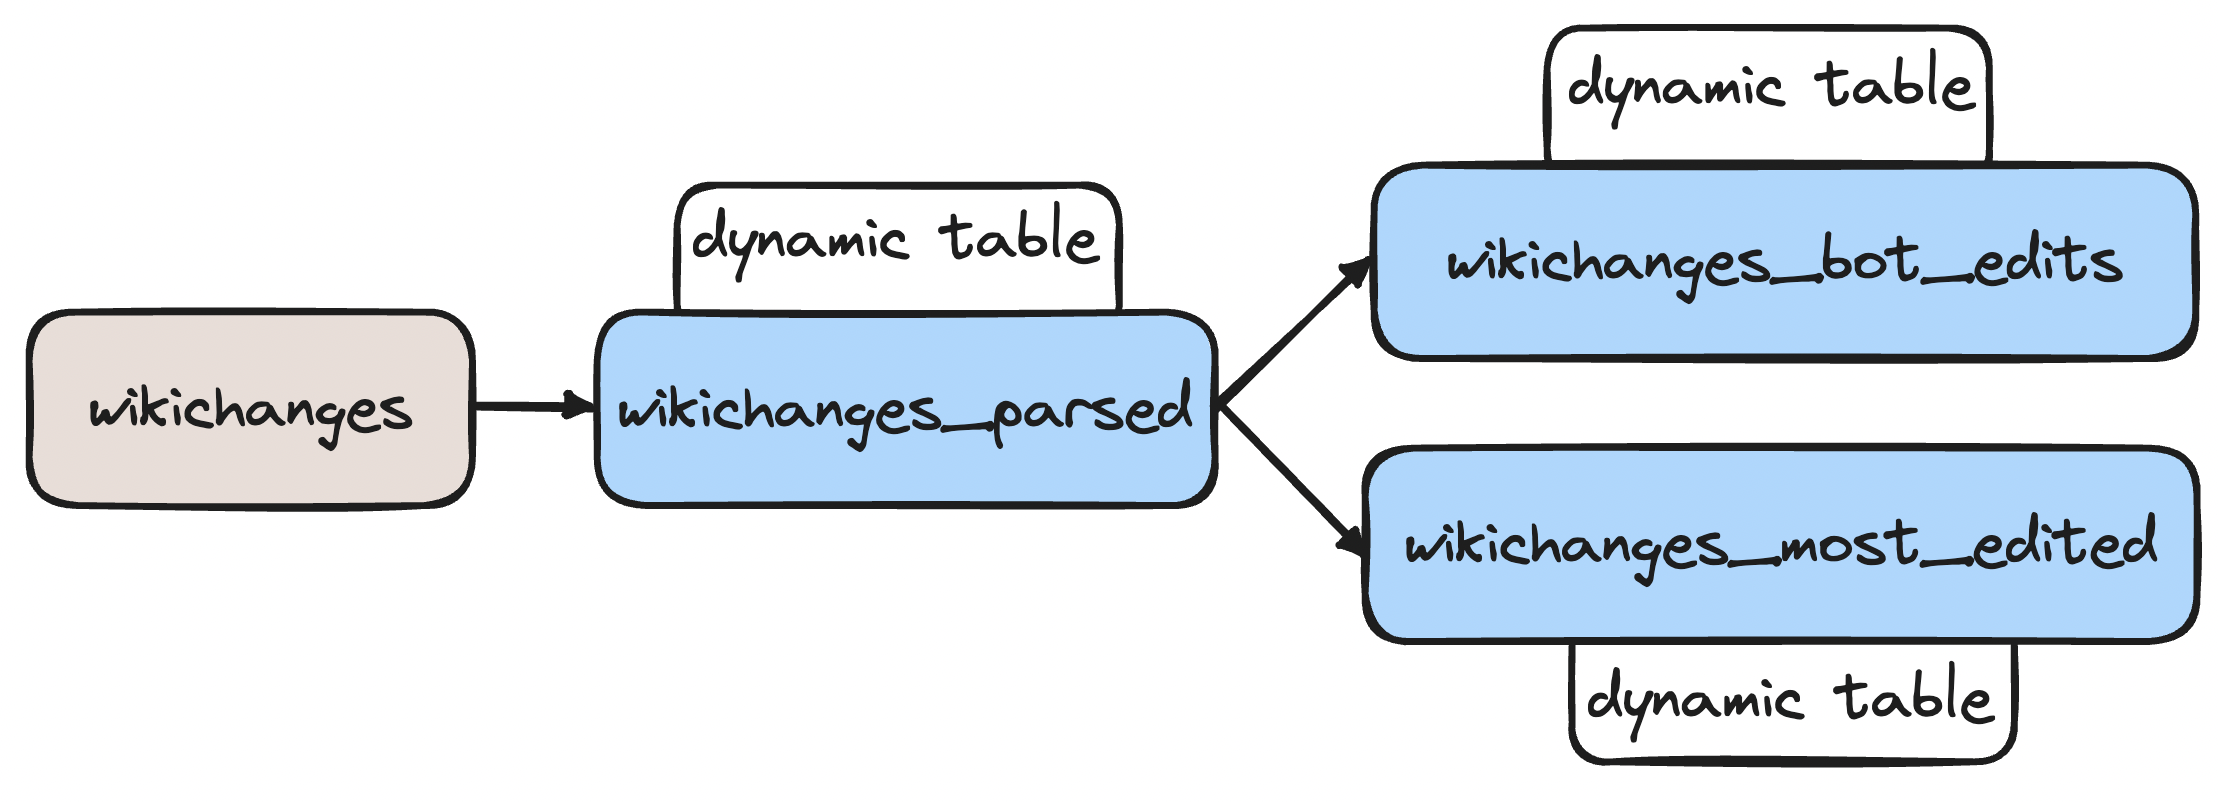
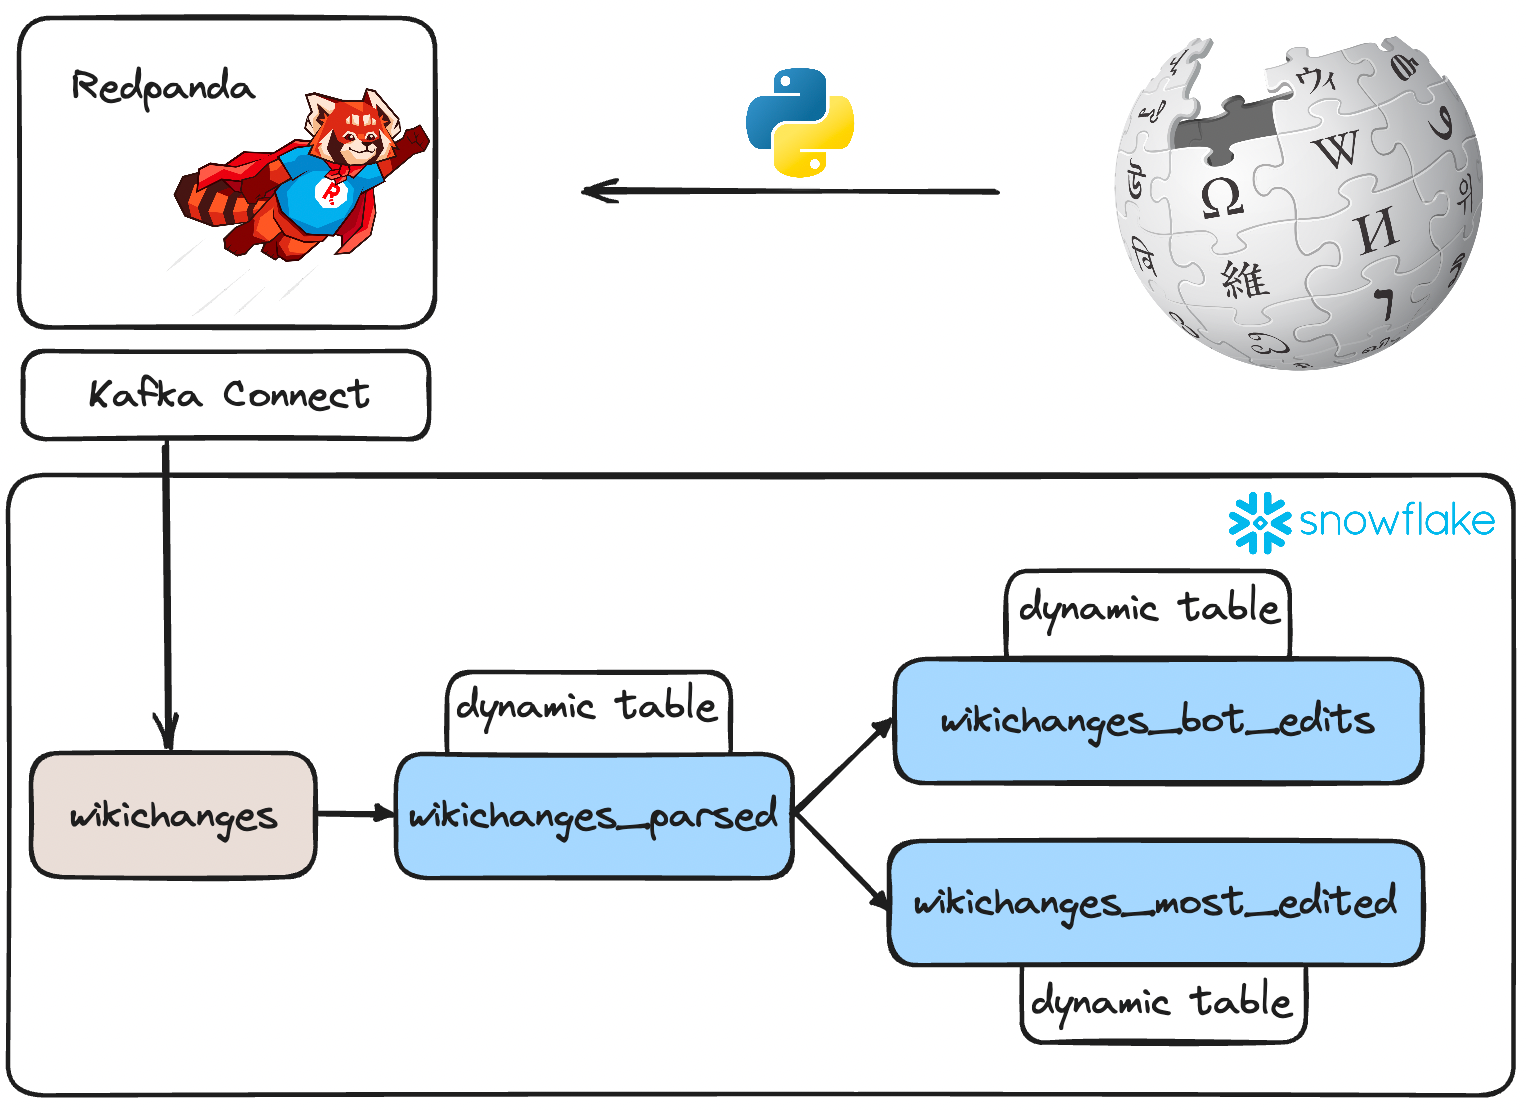
);Seasoned data folks might already see what is happening under the hood – that's right, we built a DAG!
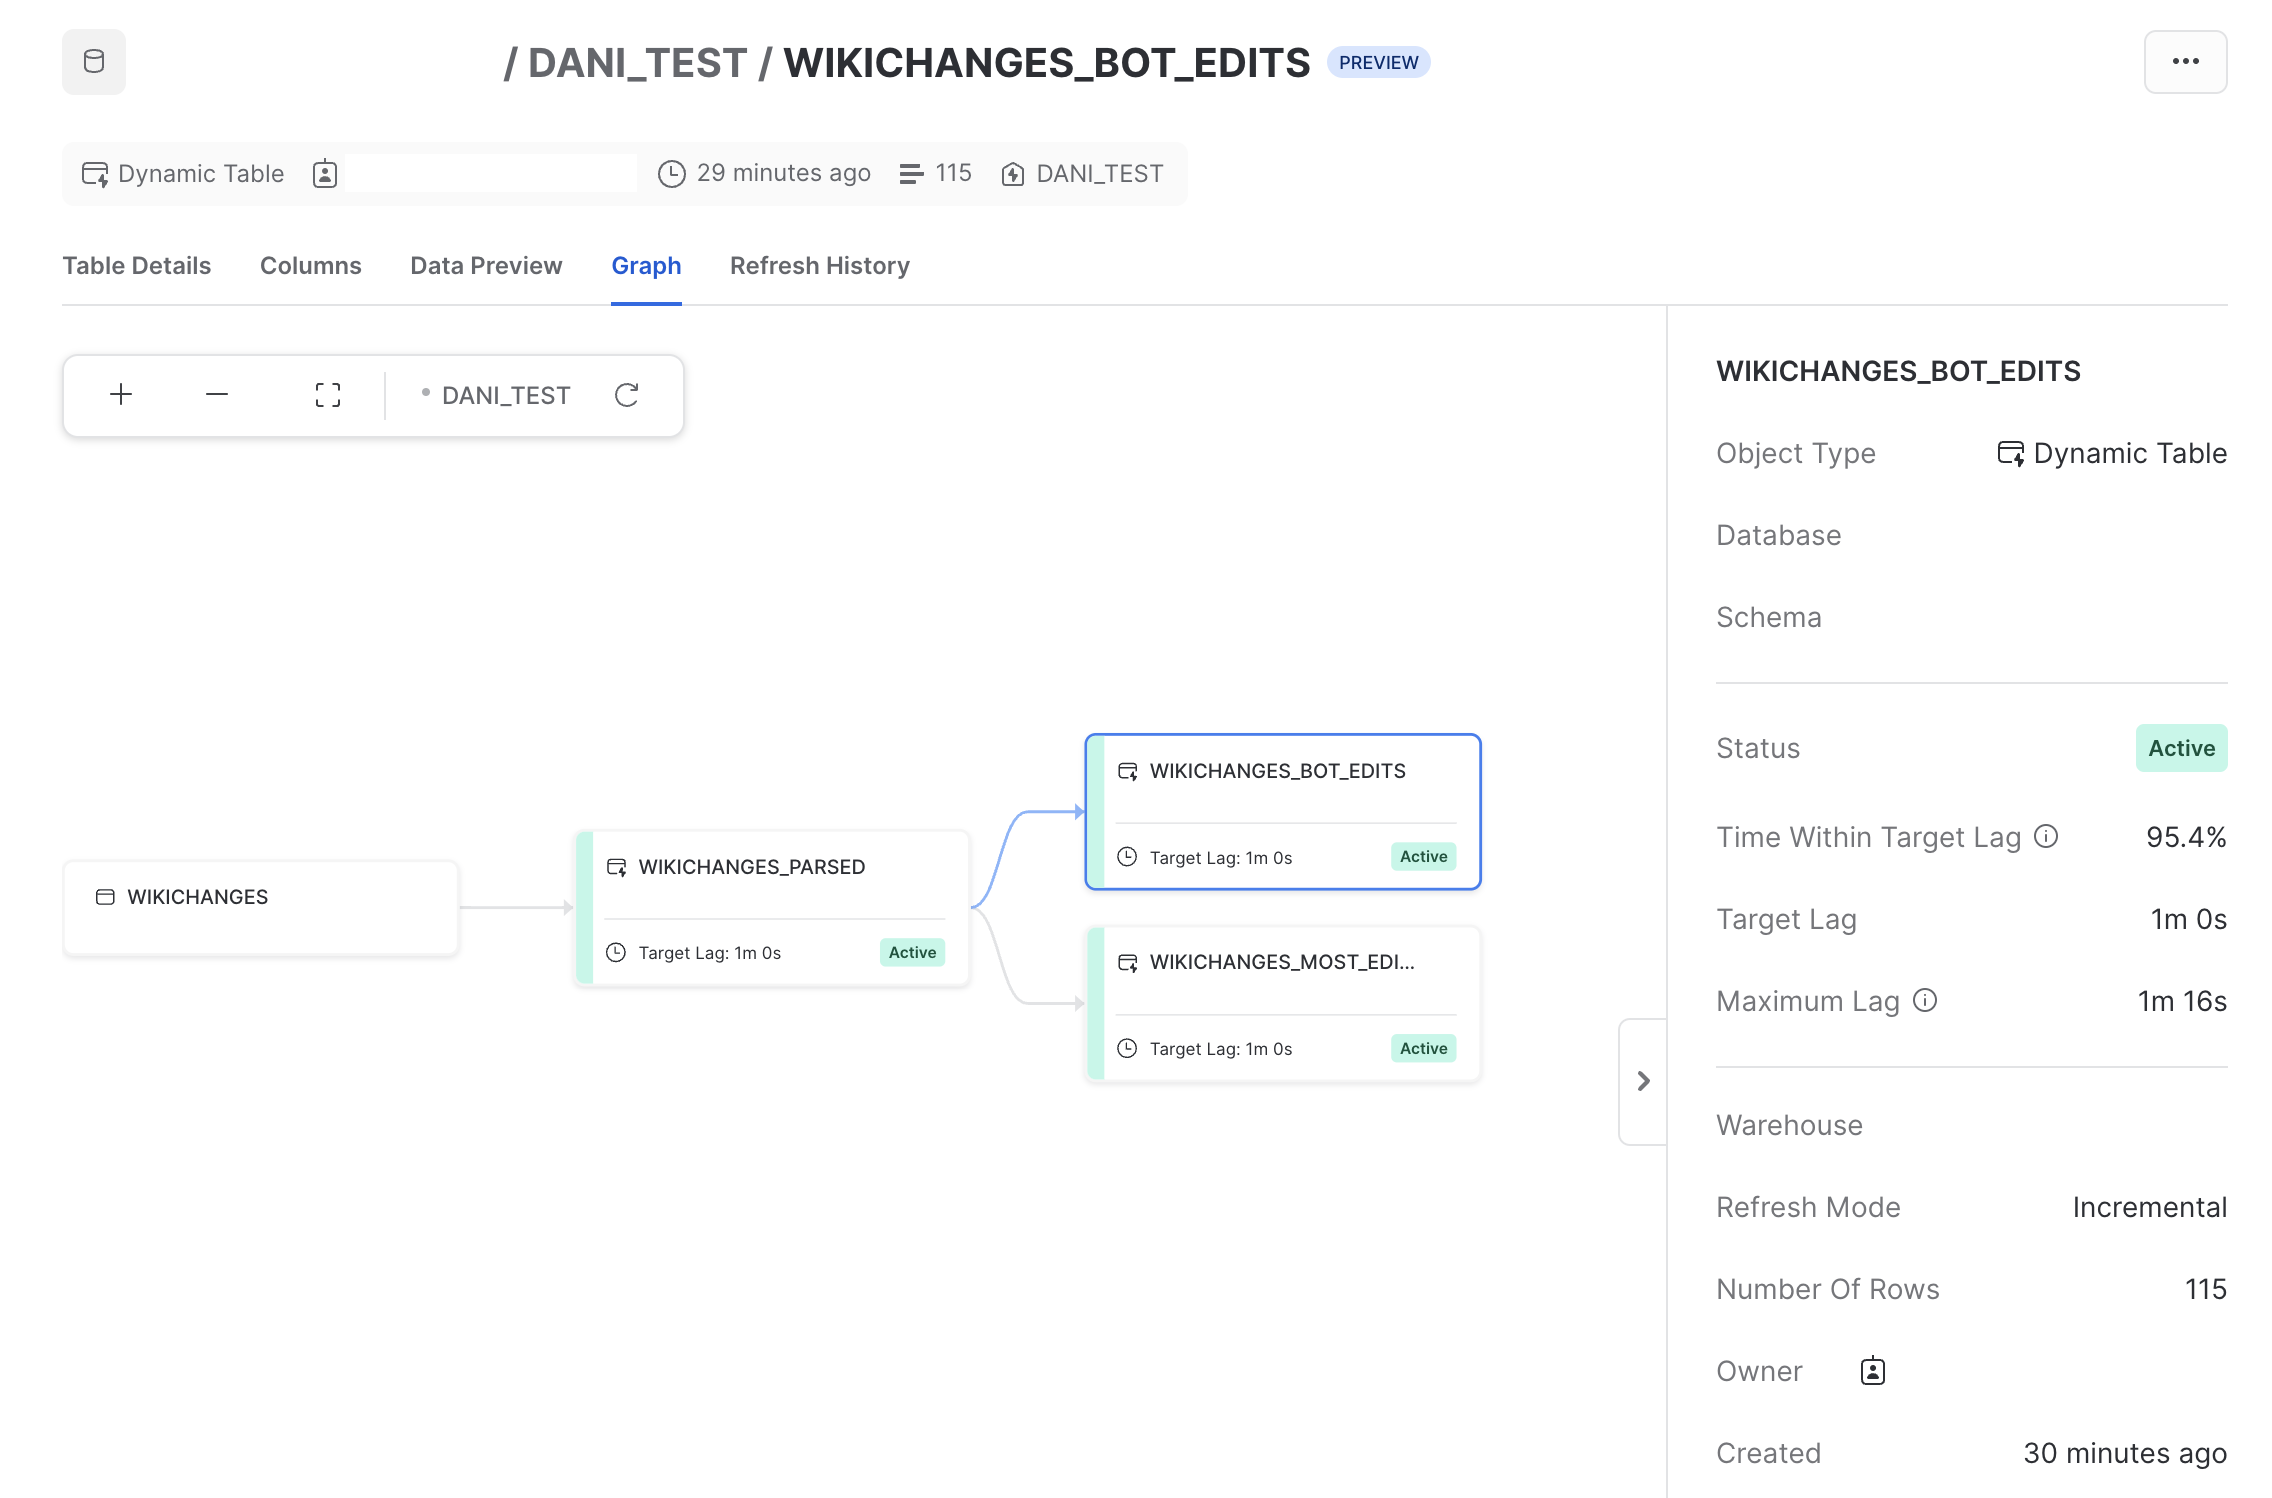
In Snowflake, we can get a high-level view of our DAG, with some additional useful information, such as the target lag for each dynamic table, the number of records, and even some operational metrics such as "Time Within Target Lag".
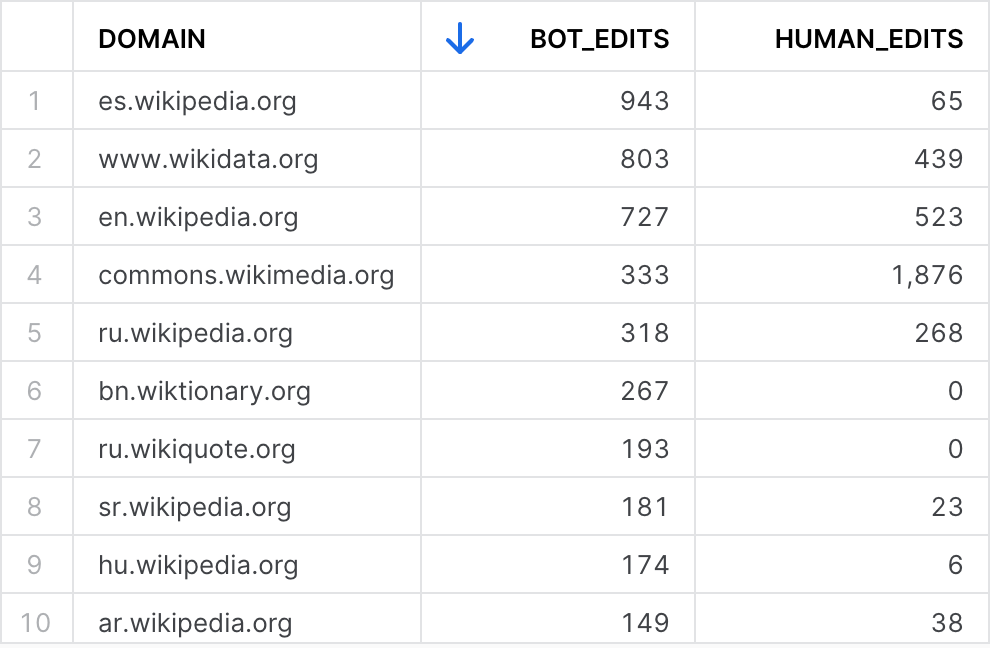
Let's take a look at the data in our downstream tables. The dynamic table called "wikichanges_bot_edits" collects data regarding how many changes were triggered by bots and humans. If we take a peek, we can see the current results:
But, if we wait until the next refresh trigger, and query the table again, we can see that the numbers have changed!
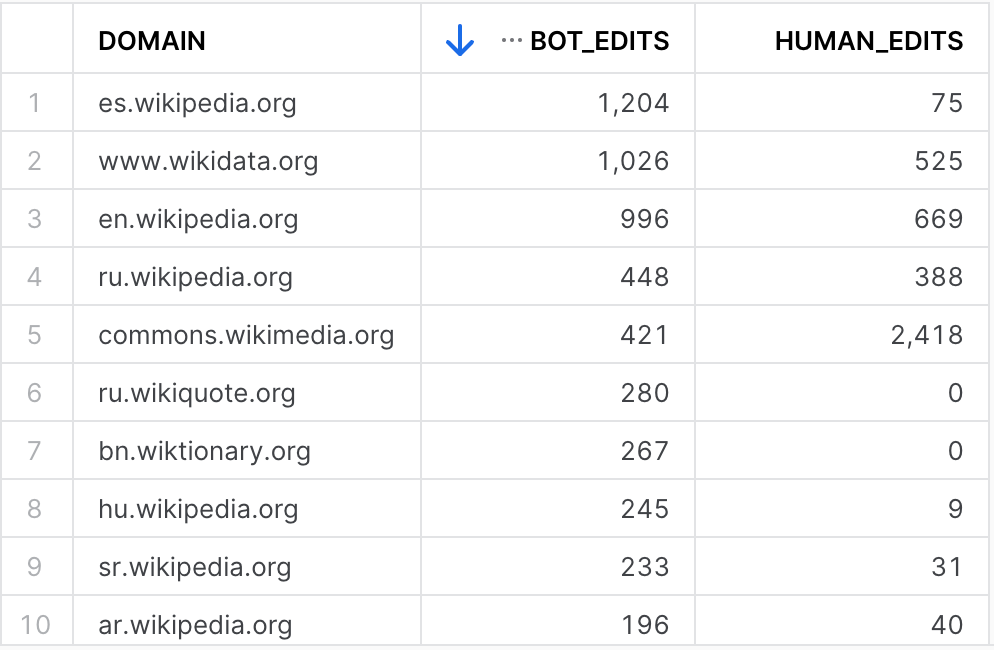
This is because the underlying dynamic table's data also changed, which was picked up, in an incremental fashion, when this table's refresh was triggered.
Lot's of bots editing pages under the Spanish 🇪🇸 wikipedia domain, interesting!
What about the other dynamic table we created, wikichanges_most_edited?
First query results:
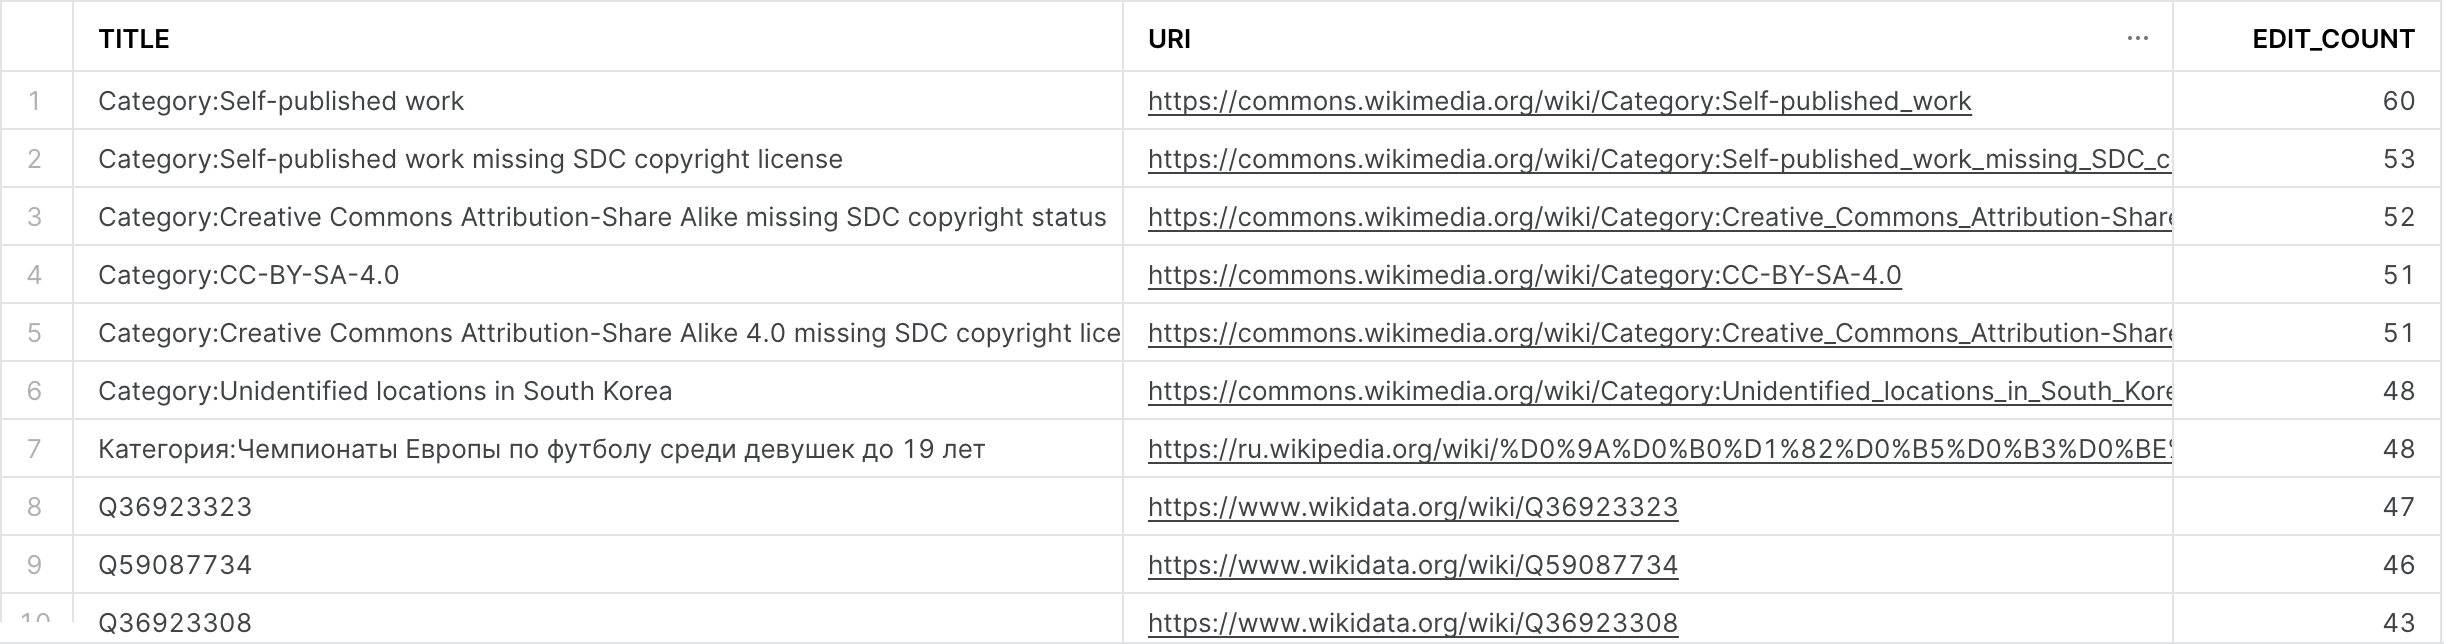
Second query results:
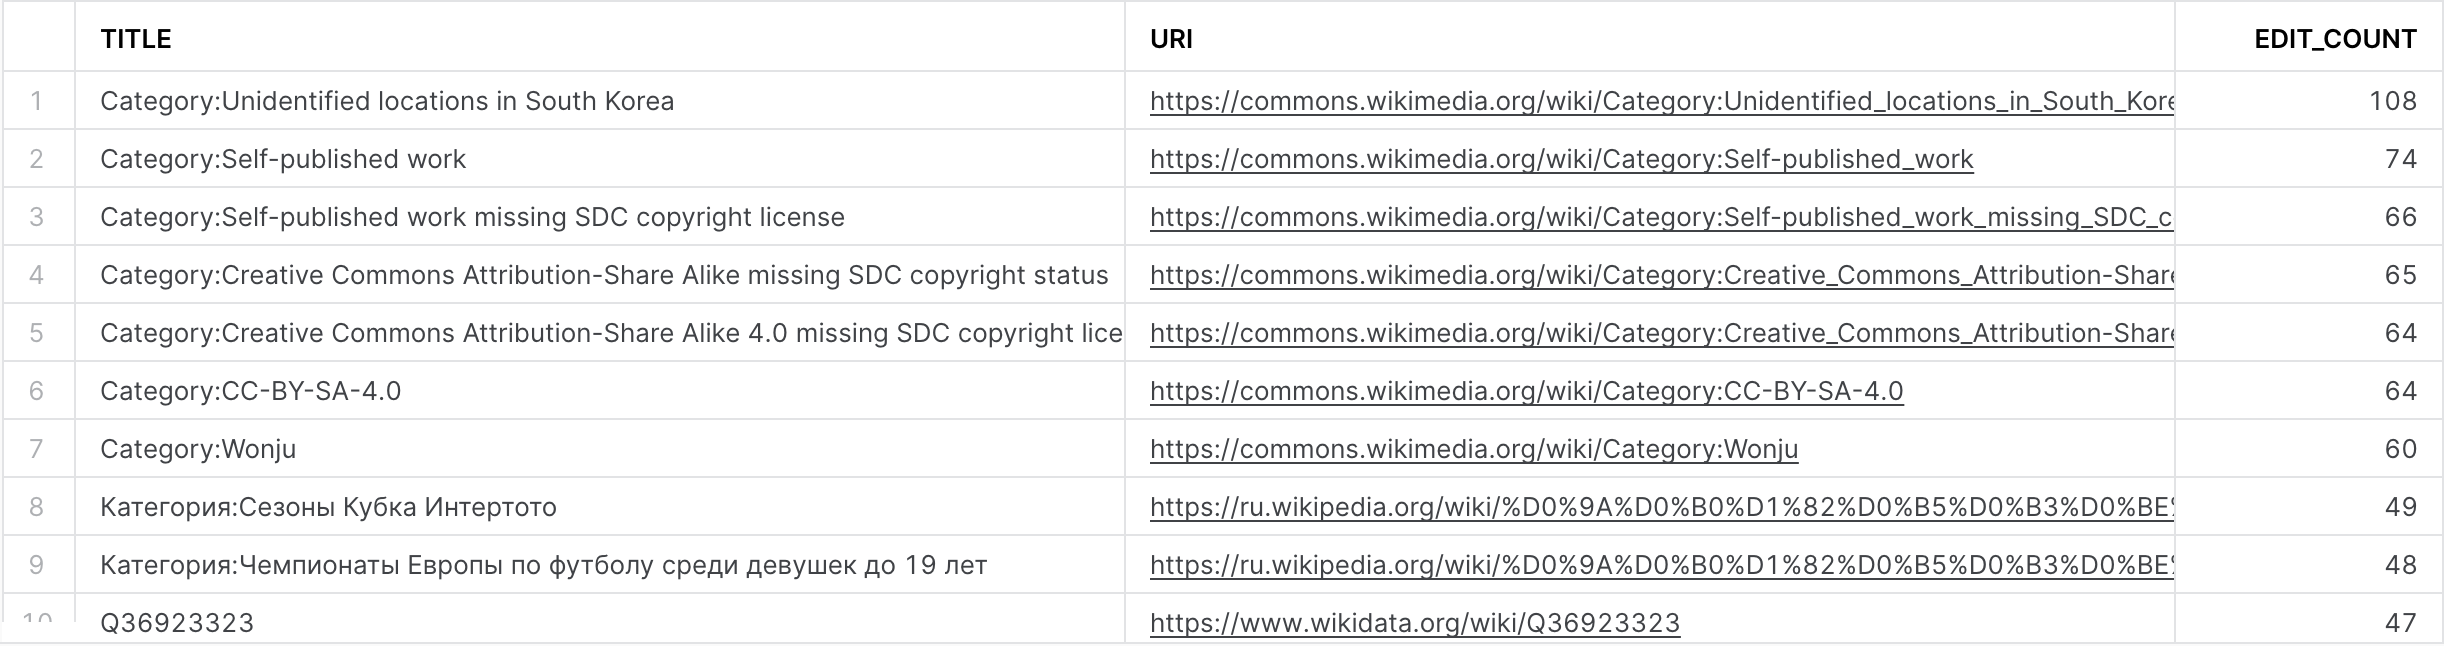
Looks like it's working as intended – the table is being updated constantly as data arrives in Snowflake straight from the API.
Conclusion
Dynamic tables can be the backbone of modern data transformation pipelines. Their ability to automate, simplify, and enhance the data engineering process can make them indispensable in the Snowflake ecosystem. With dynamic tables, Snowflake has the foundation to take on Dataform with BigQuery without needing dbt!
The complete code for this project is available in the following repository: https://github.com/danthelion/wikimedia-realtime-analytics/tree/main
Member discussion