ELT with Meltano (PostgreSQL -> Snowflake)
Meltano is an up and coming player in the data engineering field, leveraging existing technology to build the source and target connectors.
In their own words:
Meltano lets you easily extract and load data from and to databases, SaaS APIs, and file formats using Singer taps and targets, which take the role of your project’s extractors and loaders.
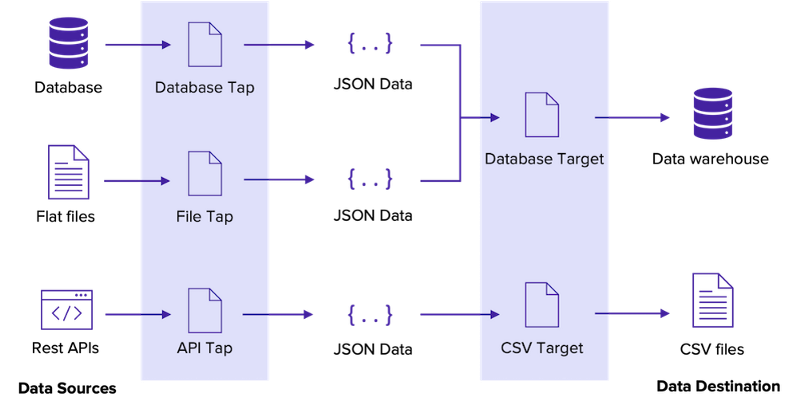
There are ~300 existing taps available (although keep in mind that they vary in quality) but with the Meltano SDK writing a tap or a target is a breeze.
In this example we’ll build a simple pipeline that will load change data events from PostgreSQL into Snowflake, straight from the source databases binlog.
All code shown in this article is available in this repository:
https://github.com/danthelion/meltano-cdc
The source
First let’s start up our source database. For this I’ve included a handy docker-compose.yml file so in order to get rolling we just need to:$ nerdctl compose up
The image that we will run includes the wal2json PostgreSQL plugin, which is required by Meltano for log based replication.FROM postgres:14.2RUN apt-get update \
&& apt-get install postgresql-14-wal2json
The custom postgres.conf also setswal_level = logical
so we will be able to achieve proper log based CDC.
After the database is up and running there are some pre-requisites on the Postgres side we need to do. First let’s create our sample database and load some data into it.$ nerdctl exec -it pg psql -U postgres#= CREATE DATABASE pagila;
Now for the data itself:$ cat pagila/pagila-schema.sql | nerdctl exec -i pg psql -U postgres -d pagila$ cat pagila/pagila-data.sql | nerdctl exec -i pg psql -U postgres -d pagila
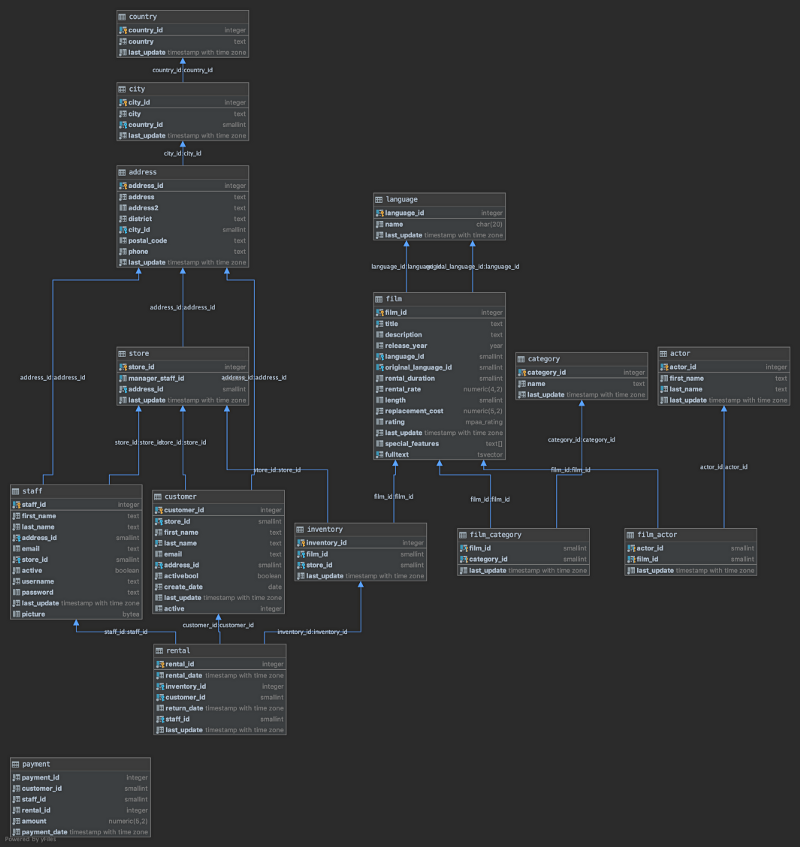
The dataset we’ll be using for this example is called Pagila.
Pagila is a port of the Sakila example database available for MySQL, which was originally developed by Mike Hillyer of the MySQL AB documentation team. It is intended to provide a standard schema that can be used for examples in books, tutorials, articles, samples, etc.
Enter Meltano
After our source database is up and running we should start working on our Meltano environment.
First create and activate a new Python virtualenv to separate our working libraries.pyenv virtualenv 3.9.10 meltano-sandbox39pyenv activate meltano-sandbox39
Install Meltanopip install meltano
Initialize our Meltano project from the CLImeltano init meltano-cdc
Add our “extractor” using the meltano CLI. (Extractor == tap == source connector, easy to get confused by the inconsistent naming.)meltano add extractor tap-postgres
Now we should be able to configure our extractor in the meltano.yml file which was initially generated by our meltano init meltano-cdc command.version: 1
project_id: 8b60f84e-01c3-4720-af7e-5ff33d11d9f1
plugins:
extractors:
- name: tap-postgres
variant: transferwise
pip_url: pipelinewise-tap-postgres
config:
host: localhost
port: 5432
user: postgres
password: postgres
dbname: pagila
filter_schemas: public
default_replication_method: LOG_BASED
environments:
- name: dev
- name: staging
- name: prod
The minimal configuration required consists of just the connection details but I explicitly setdefault_replication_method: LOG_BASED
in order to leverage the binlog so we don’t have to query the actual database.
Now to quickly test the pipeline let’s add a “loader” (Again; confusing terminology: loader == sink == target connector)
A great way to quickly test the pipeline is the jsonl loader, which will generate .jsonl files on our local filesystem that we can peek into to verify the results. Adding this snippet into the meltano.yml configuration file is all we need.loaders:
- name: target-jsonl
variant: andyh1203
pip_url: target-jsonl
config:
destination_path: cdc_output
Now we just have to initiate a meltano elt pipelinemeltano elt tap-postgres target-jsonl --job_id=postgres-to-jsonl-cdc
After a successfuly (hopefully!) run we can inspect the cdc_output foldermeltano-cdc master* ❯ tree cdc_output
cdc_output
├── public-actor.jsonl
├── public-actor_info.jsonl
├── public-address.jsonl
├── public-category.jsonl
├── public-city.jsonl
├── public-country.jsonl
├── public-customer.jsonl
├── public-customer_list.jsonl
├── public-film.jsonl
├── public-film_actor.jsonl
├── public-film_category.jsonl
├── public-film_list.jsonl
├── public-inventory.jsonl
├── public-language.jsonl
├── public-nicer_but_slower_film_list.jsonl
├── public-payment.jsonl
├── public-payment_p2020_01.jsonl
├── public-payment_p2020_02.jsonl
├── public-payment_p2020_03.jsonl
├── public-payment_p2020_04.jsonl
├── public-payment_p2020_05.jsonl
├── public-rental.jsonl
├── public-sales_by_film_category.jsonl
├── public-sales_by_store.jsonl
├── public-staff.jsonl
├── public-staff_list.jsonl
└── public-store.jsonl0 directories, 27 files
Check one of the files to verify our data is in place.cdc_output master* ❯ head public-actor.jsonl
{"actor_id": 1, "first_name": "PENELOPE", "last_name": "GUINESS", "last_update": "2020-02-15T09:34:33+00:00"}
{"actor_id": 2, "first_name": "NICK", "last_name": "WAHLBERG", "last_update": "2020-02-15T09:34:33+00:00"}
{"actor_id": 3, "first_name": "ED", "last_name": "CHASE", "last_update": "2020-02-15T09:34:33+00:00"}
{"actor_id": 4, "first_name": "JENNIFER", "last_name": "DAVIS", "last_update": "2020-02-15T09:34:33+00:00"}
{"actor_id": 5, "first_name": "JOHNNY", "last_name": "LOLLOBRIGIDA", "last_update": "2020-02-15T09:34:33+00:00"}
{"actor_id": 6, "first_name": "BETTE", "last_name": "NICHOLSON", "last_update": "2020-02-15T09:34:33+00:00"}
{"actor_id": 7, "first_name": "GRACE", "last_name": "MOSTEL", "last_update": "2020-02-15T09:34:33+00:00"}
{"actor_id": 8, "first_name": "MATTHEW", "last_name": "JOHANSSON", "last_update": "2020-02-15T09:34:33+00:00"}
{"actor_id": 9, "first_name": "JOE", "last_name": "SWANK", "last_update": "2020-02-15T09:34:33+00:00"}
{"actor_id": 10, "first_name": "CHRISTIAN", "last_name": "GABLE", "last_update": "2020-02-15T09:34:33+00:00"}
Looks good!
Now let’s hook up the Snowflake loader to get our data into it’s final place.
For this we’ll have to prepare some stuff on the Snowflake side. Running this script will create the required users/roles and permissions we will need for meltano. Make sure to change the password value and the database/schema names if you would like to customize it.-- Create a named file format.
-- This will be used by the MERGE/COPY commands to parse the files correctly from S3.
CREATE FILE FORMAT MELTANO_CDC.CDC.MELTANO_CDC_CSV
TYPE = 'CSV' ESCAPE='\\' FIELD_OPTIONALLY_ENCLOSED_BY='"';-- Create a Role with all the required permissions
CREATE OR REPLACE DATABASE MELTANO_CDC;
CREATE OR REPLACE SCHEMA MELTANO_CDC.CDC;
CREATE OR REPLACE STAGE MELTANO_CDC.CDC.CDC_STAGE;CREATE OR REPLACE ROLE ppw_target_snowflake;
GRANT USAGE ON DATABASE MELTANO_CDC TO ROLE ppw_target_snowflake;
GRANT CREATE SCHEMA ON DATABASE MELTANO_CDC TO ROLE ppw_target_snowflake;GRANT USAGE ON SCHEMA MELTANO_CDC.CDC TO role ppw_target_snowflake;
GRANT READ ON STAGE MELTANO_CDC.CDC.CDC_STAGE TO ROLE ppw_target_snowflake;
GRANT WRITE ON STAGE MELTANO_CDC.CDC.CDC_STAGE TO ROLE ppw_target_snowflake;
GRANT USAGE ON FILE FORMAT MELTANO_CDC.CDC.MELTANO_CDC_CSV TO ROLE ppw_target_snowflake;
GRANT USAGE ON WAREHOUSE COMPUTE_WH TO ROLE ppw_target_snowflake;-- Create user
CREATE OR REPLACE USER meltano
PASSWORD = 'xxx'
DEFAULT_ROLE = ppw_target_snowflake
DEFAULT_WAREHOUSE = 'COMPUTE_WH'
MUST_CHANGE_PASSWORD = FALSE;GRANT ROLE ppw_target_snowflake TO USER meltano;
After creating the required Snowflake objects, we can add the meltano extractor with the CLImeltano add loader target-snowflake --variant transferwise
Now we just need to add a configuration block to meltano.yml- name: target-snowflake
variant: transferwise
pip_url: pipelinewise-target-snowflake
config:
account: snowflake-account-name
dbname: MELTANO_CDC
user: meltano
password: xxx
warehouse: COMPUTE_WH
file_format: MELTANO_CDC.CDC.MELTANO_CDC_CSV
default_target_schema: CDC
add_metadata_columns: true
Make sure to update the Snowflake account name and password values to suit your environment. Now let’s run our pipeline with the new Snowflake loader!meltano elt tap-postgres target-snowflake --job_id=postgres-to-snowflake-cdc
If everything went well we should be able to see the tables in Snowflake (meltano creates them automatically if they don’t exist) and our data inside them.

That’s all!
Meltano makes it very simple to set up basic data pipelines and there’s a lot more it can do like scheduling jobs. The drawbacks are that you’ll have to run the service yourself (until there is a managed version available).
Meltano devs embrace the modern data stack and they provide integrations with Airflow and dbt but way more is in the plans.
Member discussion